Dr. Lawlor's Code, Robots, & Things

August 17, 2023

UAF On-Campus Wifi Setup

Filed under: Linux, Sysadmin — Tags: , — Dr. Lawlor @ 12:38 pm

Fall 2023 classes are starting soon, and people are coming back on the University of Alaska Fairbanks (UAF) campus and need wifi!

Your options are:

  • UAGuest: a pain to set up every time, and then capped at 10 megabit (the other options are 20x faster in a non-congested area!).
  • eduroam: uses certificates, the easiest setup is the eduroam CAT (configuration assistant tool). Runs at up to 200 megabit, and works at almost any university around the world.
  • UAlaska: uses your UA single sign-on password. This seems to be the most reliable connection, except you may need to manually switch to “PEAP” instead of the default TLS authentication, like this:

The flip side of this is to access university resources from off campus, you need the OIT VPN, which recently broke on Linux and I haven’t gotten it running again.

February 22, 2023

Starlink Economics

Filed under: Random Thoughts — Dr. Lawlor @ 9:53 pm

A written response to Thunderf00t / Phil Mason’s Jul 13, 2021 video (“Starlink: BUSTED!!”), which I’m not linking to because nobody else should be forced to endure his mocking, derisive tone.

Phil: Falcon 9 launch cost to SpaceX is $60M.

Actual: that’s what they charge external customers. Actual internal cost is like 1/2 (CNBC) to 1/4 (Musk) that number.

Phil: Starlink ground stations will pay $1B/year for bandwidth.

Actual: Tier 1 ISP peers do not pay for bandwidth, since they transit each other’s traffic. (Starlink isn’t Tier 1 yet, but offers connection scope that will eventually get it there.)

Phil: Customers require 20 Mbps, so a 20 Gbps sat can only serve 1,000 customers.

Actual: US fixed broadband customers average less than 3 Mb/sec during prime time.
(So a 20 Gbps sat can serve over 6,000 customers.)

Phil: A fully-deployed 10,000 satellite Starlink network can only support 3 million customers “at best”.

Actual: With 3,580 satellites Starlink is currently supporting over 1 million customers, despite huge countries like India and Indonesia not having service yet.

Phil’s general approach here is to fudge all his numbers a few-fold worse than reality, and to no one’s surprise, the business case then doesn’t make sense. Using today’s numbers, 1 million residential customers @ $110/month = $1.32 billion/year gross revenue; 50 launches/year @ $15M(?) internal cost = $0.75 billion/year launch cost, so the system economics hinge on the per-satellite cost and longevity. That’s not counting the extremely lucrative business, airline, maritime, and military customers, growth potential in many countries (esp. middle east, south Asia), and Starship enabling much more capable satellites.

I hope Starlink succeeds, it’s 10x faster than my other options available here in Alaska, and I love it!

October 19, 2022

Get a phone onto LTE Network

Filed under: Hardware, Phones, Sysadmin — Dr. Lawlor @ 5:56 pm

I’ve had an AT&T prepaid account for decades, but a recent phone upgrade only worked for texts, not voice (I get “Emergency Service Only” when I try to make calls). AT&T shut down their 3G network in February, so phones need to use LTE to work at all now.

I took the phone to an AT&T store, and they installed a slightly dodgy-looking app “ForceLTE”, but couldn’t actually get the phone to make calls on AT&T (despite the phone model number showing up in AT&T’s list of tested and working devices).

Reading the app instructions, it basically just uses the standard secret dialing code *#*#4636#*#* and picks “Device Information”. I tried setting the Preferred Network Type to “LTE only”, and the phone immediately connected to the AT&T network successfully.

I can now make voice calls and use data!

September 10, 2020

Palo Alto GlobalProtect on Linux via OpenConnect

Filed under: Linux, Sysadmin — Dr. Lawlor @ 11:41 pm

My university (UAF) just migrated to Palo Alto GlobalProtect as their VPN. When I log into the VPN web interface it shows binary download links for Windows and Mac, but not Linux. Evidently there is a Palo Alto GlobalProtect client for Linux hidden somewhere behind their customer support portal, but the portal won’t let you create an account without a device serial number or sales order number (which is ridiculous!).

There’s a decent little quirky open source project to talk to several VPN servers called “openconnect“, by David Woodhouse, who wrote JFFS2 and several other kernel features. I grabbed the git version, which built and installed fine on my Ubuntu machine like this:

sudo apt-get install git wget gcc libtool m4 automake autotools-dev
git clone https://gitlab.com/openconnect/openconnect/
cd openconnect

# Seems to need a "vpnc-script" before config works
wget http://git.infradead.org/users/dwmw2/vpnc-scripts.git/blob_plain/HEAD:/vpnc-script
chmod +x vpnc-script
sudo mkdir /etc/vpnc
sudo cp vpnc-script /etc/vpnc/vpnc-script

# OK, normal config from here
./autogen.sh
./configure
make check
# FAIL: bad_dtls_test is OK, we're not using Cisco
sudo make install
sudo ldconfig

(Don’t worry about the “CSD trojan” comments during install, he’s just making fun of Cisco’s post-connect downloaded program by calling it a Trojan horse.)

Once it was installed, I’m now able to connect to the UA VPN like this:

sudo openconnect  --allow-insecure-crypto --protocol=gp  https://vpn.alaska.edu

You log in with your normal UA credentials, and as soon as it connects you’re on the UA VPN. Press control-C to disconnect. I made a script out of this, and pass the “–user=” option so I only need to enter my password. Slick!

(As of 2023, I now get a two-factor(?) challenge “SAML POST authentication is required via…”. If anybody can figure out what to do with this, please leave a comment or email me!)

April 27, 2020

Video masking in Kdenlive

Filed under: Random Thoughts, Video Editing — Dr. Lawlor @ 12:24 am

A key trick for fancy video effects is masking, which lets you combine parts of one video with parts of another video (this is easier if they’re all shot on the same tripod setup). I figured out how to do basic image-driven masking in Kdenlive today.

Open the GIMP and draw a “mask”: black for the parts of the frame you want to be the background video, and transparent (gray checkerboard) for those you want kept as the foreground video. Blur out the boundary to make it much harder to see the edge between shots. Save your mask as PNG and import into Kdenlive as a clip.

Drag the mask image clip to your timeline on top of your foreground and background video clips. Stretch the time out to cover your scene.

Right click the mask clip, “Add Transition” -> “Composite and Transform”. Set the “Compositing” operator to “Destination out” to have the mask’s black parts chop out your foreground. Drag out the composite and transform transition to cover your whole shot.

Now right click the foreground clip, “Add Transition” -> “Composite” the result Over the backdrop (the default). Drag out the transition to cover the whole shot.

masking_demo_shot

You should immediately be able to play your composited scene. Set the mask-to-foreground compositing operator to “Destination in” if you want black as foreground, transparent as background. Tweak your brightness levels (I prefer “Add Effects” -> “Curves”) and start working on the next Orphan Black.

(Or at least you can impress your mom!)

February 11, 2020

Starting generator at -26F

Filed under: Alaska, Random Thoughts — Dr. Lawlor @ 2:32 pm

We had a fairly long power outage starting early this morning just after 3am.  Because the outside temperature was -26F this morning in Fox, Alaska, by 9am the house had cooled to about 54F and we were starting to get concerned.  Our frozen foods were OK just being stored outside on the deck, and our refrigerator was likely to be OK as the house interior slowly cooled to near refrigerator temperature, but all our plumbing was cooling off rapidly without heat tapes, and it’s annoying to live without running water.

But this September I’d bought a Firman propane / gasoline generator–a solid machine, but at 220lb, they’re not kidding about two person lift!  I’d also wired up an interlocked main breaker generator transfer switch when I reworked our electrical service for solar this summer.  (I’m not paid by any manufacturer, just a happy customer!)

I have the generator fed from a portable 20lb propane cylinder so we can leave it fueled and ready to go (stale gasoline won’t start in the cold), and had installed full synthetic 5W-30 motor oil that the generator manual recommends for cold weather, but it still took a few tries to get the generator running in the cold.  The choke seems to behave strangely in cold weather, but after a few tense minutes of alternating between the onboard battery powered starter and the hand-pull rope, the generator lit.  As soon as I flipped the transfer switch to power the house, I could see the furnace kick on, and our radiators were soon warm, and our plumbing safe.

Our electricity is incredibly reliable here because our local utility GVEA is awesome, and the Fox electrical substation also serves a gold mine–one that loses about $1M/day if they don’t have electricity.  So GVEA got the power back on less than an hour after I got the generator running.  But it was nice to verify that our generator can keep the house running–in the extreme cold, the difference between shivering in the dark and basically having a normal day can be a modest up-front investment!

October 14, 2019

Making UNIX do what you want

Filed under: Linux, Random Thoughts — Dr. Lawlor @ 10:15 am
hal> open the pod bay doors
I'm sorry, Dave, I'm afraid I can't do that: permission denied.
hal> open the pod bay doors please
I'm still getting permission denied, Dave.
hal> sudo open the pod bay doors
They're opening now, Dave.

September 11, 2019

Architectural Chroot for Raspberry Pi

Filed under: Linux, Programming, RaspberryPi, Servers, Sysadmin — Dr. Lawlor @ 8:59 pm

One easy way to do sysadmin, apply updates, or other maintenance on a Raspberry Pi or BeagleBone Black is to pull out the microSD storage card, and put it into a full size Linux computer.  The tricky part about this is your big computer uses x86, and the Pi/BeagleBone uses an ARM chip, so even if you mount the ARM filesystem you can’t directly run its programs.  There’s a neat fix (hat tip: Sentry’s Tech Blog) called architectural chroot that emulates the ARM binaries using QEMU, registered directly with your regular x86 kernel using binfmt_misc:

sudo apt-get install qemu-user-static
mkdir arm_mnt
sudo mount /dev/mmcblk0p2 arm_mnt
cd arm_mnt
sudo mount -o bind /dev dev
sudo mount -o bind /proc proc
sudo mount -o bind /sys sys
echo ':arm:M::\x7fELF\x01\x01\x01\x00\x00\x00\x00\x00\x00\x00\x00\x00\x02\x00\x28\x00:\xff\xff\xff\xff\xff\xff\xff\x00\xff\xff\xff\xff\xff\xff\xff\xff\xfe\xff\xff\xff:/usr/bin/qemu-arm-static:' | sudo tee /proc/sys/fs/binfmt_misc/register
sudo cp /usr/bin/qemu-arm-static usr/bin/
sudo chroot .

From inside the chroot, you can now run programs and do sysadmin as if you were on the emulated ARM machine, but you still have the RAM and network access of the host (emulation slowdown makes up for the faster x86 CPU though, so compute is about the same speed).  To make network access work, I needed to add my host computer’s hostname as 127.0.0.1 in the chroot etc/hosts file, and you might need to copy in /etc/resolv.conf from the host.

To clean up, exit the chroot with ctrl-D, and:

sudo umount dev proc sys
cd ..
sudo umount arm_mnt

(If it won’t let you unmount, use “lsof | grep arm_mnt” to find the offenders, like a dbus fired up by doing an update.)

This is a handy way to add user accounts, configure a headless machine, or grab data from your Raspberry Pi even if it won’t boot!

March 24, 2019

SteamVR 2.2 Input: Tiny Example

Filed under: Programming, Unity, VR — Dr. Lawlor @ 5:39 pm

They keep changing the SteamVR VIVE input system, most recently for the knuckles controller.

As of SteamVR 2.2, you the game programmer define the space of possible Actions in Unity “Window -> SteamVR Input”.  The user is theoretically supposed to be able to customize these in SteamVR “Devices -> Controller Input Binding”, although you provide a JSON file of hopefully working defaults.  You the programmer connect the user-visible Actions to your scripts in Unity Inspector, which seems like a lot of moving pieces to get right.  (More “Linux gaming” than “console gaming”.)

For example, here’s some code to read a boolean Action in Unity 2018.3 via a new Project -> Assets -> Create -> C# Script:

using System.Collections;
using System.Collections.Generic;
using UnityEngine;
using Valve.VR;

public class DumpVR : MonoBehaviour
{
  public SteamVR_Action_Boolean Teleport=SteamVR_Input.GetAction<SteamVR_Action_Boolean>("default", "Teleport");

  void Start()
  {
    Debug.Log("Started DumpVR"); 
  }

  void Update()
  {
    if (Teleport.GetState(SteamVR_Input_Sources.Any))
    {
      Debug.Log("Teleport hit");
    }
  }
}

Add the SteamVR Plugin for Unity and drag up a SteamVR->Prefabs -> CameraRig to replace the default camera. VR head tracking should work already.

Add a Sphere (Scene -> right click -> 3D Object -> Sphere) and drag your new DumpVR script on top of your new sphere.

The first time you run this, you might get the following weird error when you try to GetState on your Action:

NullReferenceException: Object reference not set to an instance of an object
Valve.VR.SteamVR_Action_Boolean.GetState (Valve.VR.SteamVR_Input_Sources inputSource) (at Assets/SteamVR/Input/SteamVR_Action_Boolean.cs:94)
DumpVR.Update () (at Assets/VRtests/DumpVR.cs:17)

To make it work, you just need to select an already-defined action for this instance of the script.  Look at where DumpVR is bound to your Sphere in the Unity Inspector:
Unity_SteamVR_Actions

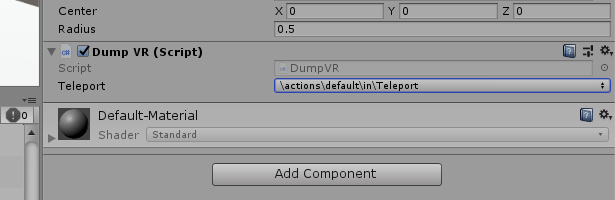
For me that dropdown was initially set to “None”, causing that NullReferenceException error at runtime.  (But sometimes it autofills correctly.)

That’s a button. For location transforms, I was able to pull the position and rotation (“pose”) from the left hand and change the containing object’s transform with:

using System.Collections;
using System.Collections.Generic;
using UnityEngine;
using Valve.VR;

public class HandyPoser : MonoBehaviour
{
  public SteamVR_Action_Pose Poser=SteamVR_Input.GetAction<SteamVR_Action_Pose>("default", "Pose");
  public SteamVR_Input_Sources source=SteamVR_Input_Sources.LeftHand;
  void Start()
  {
  }

  void Update()
  {
    Vector3 pos=Poser.GetLocalPosition(source);
    Quaternion rot=Poser.GetLocalRotation(source);
    Debug.Log("Left hand: pos "+pos+" rot "+rot);
    transform.localPosition=pos;
    transform.localRotation=rot;
  }
}

There’s a bit more description at valve’s samples site, and hairier examples in Assets/SteamVR/InteractionSystem/Samples.  The source code for the user-visible classes is in Assets/SteamVR/Input.

January 29, 2019

LIDAR Selfie

Filed under: Graphics, Programming, Robotics — Dr. Lawlor @ 6:24 pm

Today I unpacked and hooked up an Ouster OS-1-64 LIDAR that they generously donated to UAF’s robotics team.  This is one of the few LIDAR units capable of actually taking a selfie, because it also captures reflectance (top) along with distance (bottom) data.  I’m looking forward to building autonomous robots using this accurate, robust, and capable sensor!

it_works2

(This is about 1/4 of the full 360 degree horizontal field of view.)

Linux cheatcodes: to start off, you need to find the unit’s .local name.  Plug the lidar into ethernet and power it up, wait until it grabs a DHCP address and starts spinning.  Either look through the server’s DHCP leases, or portscan your network for the control port:

nmap –open -sT -p 7501 <your subnet>/24

nmap will report the lidar’s IP address.  Add an http:// to visit the config page, which gives you the “os1-XXXXXX.local” address that you can use thereafter.

To view the data (like above), do:

git clone https://github.com/ouster-lidar/ouster_example
cd oster_lidar/ouster_example/ouster_viz/
sudo apt-get libeigen3-dev libvtk6-dev libjsoncpp-dev
mkdir build
cd build
cmake ..
./viz os1-XXXXXXXX.local <your machine’s IP address>

This will show the lidar returns onscreen!

Older Posts »

Blog at WordPress.com.